Building
To build an organistional webapp, there are a number of standard steps that you need to go through to ensure the project and outcome (as designed) are as expected.
Now that you have your design complete and agreement to move ahead with the build, the following will guide you through some standard steps that will help deliver the webapp as expected.
In this guide we will use the same example organisation as used in the designing quick start.
Collaboration
Set up conversation in console.mydigitalstructure.cloud to manage all the team conversations and links to key documents etc.
Use GSuite to manage documents, including those with client - get them to use comments.
If working in team the divide the work up by User Role.
Use project check-in meetings (in-person or online) to communicate progress, discuss design and an issues.
Example Project Check-In Document Example Testing Tracking Sheet
Planning
Use Planning template (link below) to capture all the tasks required to complete the build based on the design document.
Take each of the user role processes and classifying by effort (Skill): Basic (1 hour), Standard (4 hours), Complex (8 hours) and units of work required.
This will result in a total hours for the project.
Agreement
Get agreement with the client on cost, timeframes and work required by them.
The Build
Zones;
Using console.mydigitalstructure.cloud;
- Create a lab space
- Create User Roles to match design
- Create a User for each of the User Roles
Create the form foundation of the webapp;
Using the project costing sheet as a reference (which was based on the design).
- In the layout file (1901.layout...) set up the side menu.
-
Create the form (HTML) file for each of the user-roles.Use the filename format [siteid].[user-role]-[version number]-url_[user-role*].htmleg 1901.customer-1.0.0-url_customer.html* if the role is more than one word then use a hyphen eg customer-serviceThe url_ part makes it easier to update the webapp pages, which is covered later.
- In each of the files create the base form using the process in the design and comment in the details for each process
You now have the form foundation done!
Create the function foundation of the webapp;
Again using the project costing sheet as a reference (which was based on the design);
-
Create a file for each of the user-role process groups (ie as per the menu items in side layout)Use the filename format [siteid].[user-role].[process-group]-[version number].jseg 1901.customer.view.menu-1.0.0.js
- In each of the files add code to add the controllers to the webapp as per the processes above. [show image of example]
You now have the function foundation done!
Set up the app foundation;
In "app.js".
| Item | Description | ||||||||||||||||||||||||||||||||||||||||||||||||||||||||||||||||||||||||||||||||||||||||||||||||||||||||||||||||||
|---|---|---|---|---|---|---|---|---|---|---|---|---|---|---|---|---|---|---|---|---|---|---|---|---|---|---|---|---|---|---|---|---|---|---|---|---|---|---|---|---|---|---|---|---|---|---|---|---|---|---|---|---|---|---|---|---|---|---|---|---|---|---|---|---|---|---|---|---|---|---|---|---|---|---|---|---|---|---|---|---|---|---|---|---|---|---|---|---|---|---|---|---|---|---|---|---|---|---|---|---|---|---|---|---|---|---|---|---|---|---|---|---|---|---|---|
Standard controllers |
|
||||||||||||||||||||||||||||||||||||||||||||||||||||||||||||||||||||||||||||||||||||||||||||||||||||||||||||||||||
options |
|
||||||||||||||||||||||||||||||||||||||||||||||||||||||||||||||||||||||||||||||||||||||||||||||||||||||||||||||||||
Routing rules |
|
||||||||||||||||||||||||||||||||||||||||||||||||||||||||||||||||||||||||||||||||||||||||||||||||||||||||||||||||||
View update messages |
|
User Interface/Experience;
| Item | Description |
|---|---|
Design Template |
|
Icons |
Fontawesome |
Dates/time |
Use momentjs to work with dates and times.
|
Numerals |
Use numeraljs to work with numbers.
|
Utility functions |
Use lodash to add useful utility functions. eg _.each() to interate through and array.
|
PDF Creation |
Use pdfmake to create PDFs within the browser.
|
Text editor tips |
As per the quick start guide suggest using sublime, but can use what every you prefer eg VSCode.
Suggest using two vertical windows;
|
mydigitalstructure Util SDK;
| Item | Description | ||||||||||||||||||||||||||||||||||||||||||||||||||||||
|---|---|---|---|---|---|---|---|---|---|---|---|---|---|---|---|---|---|---|---|---|---|---|---|---|---|---|---|---|---|---|---|---|---|---|---|---|---|---|---|---|---|---|---|---|---|---|---|---|---|---|---|---|---|---|---|
Data caching |
|
||||||||||||||||||||||||||||||||||||||||||||||||||||||
View updating |
|
||||||||||||||||||||||||||||||||||||||||||||||||||||||
View updating using the view queue (app.vq) |
|
||||||||||||||||||||||||||||||||||||||||||||||||||||||
Handlers
Based on class or id
The handlers code is in mydigitalstructure.util.
|
| ||||||||||||||||||||||||||||||||||||||||||||||||||||||
Object schema |
learn.mydigitalstructure.cloud/schema | ||||||||||||||||||||||||||||||||||||||||||||||||||||||
Debugging |
Use core_debug_log and console.mydigitalstructure.cloud > DEBUG LOGS | ||||||||||||||||||||||||||||||||||||||||||||||||||||||
Object structures |
You can add fields to existing objects or create your object structure. To access your own (private) fields start with any underscore eg _myfield. Use console.mydigitalstructure.cloud > STRUCTURES. | ||||||||||||||||||||||||||||||||||||||||||||||||||||||
Validation |
mydigitalstructure has some inbuilt validation functionality.
Assuming element already has data-scope & data-context set.
The first thing is to add the myds-validate class to the element.
Then add attributes to the element;
Set
data-validate-controller to have it invoked on keyup & focusout. Validation status is passed to controller.
And use
app.get[{scope; [scope]}] to get the latest validation status
Class
myds-validate-error is added to the element mydigitalstructure.util-x.x.x.css has this styled as a red border for the element. You can set your own styling for this class. You can also use the validation controller to add other visual elements/
You can also manually invoke a validation check using the util-validate-check controller. ie before saving of a new record.
eg
app.invoke('util-validate-check', {scope: 'contact-edit-'});
Options:
|
||||||||||||||||||||||||||||||||||||||||||||||||||||||
Utility controllers |
If mydigitalstructure.init option viewAssemblySupport: is set to true some useful controllers will be add to your app eg util-view-table.
|
||||||||||||||||||||||||||||||||||||||||||||||||||||||
Drop downs |
Use class myds-dropdown. Can also use autocomplete. | ||||||||||||||||||||||||||||||||||||||||||||||||||||||
Creating form dynamically |
Function creating form - working with static form driving function | ||||||||||||||||||||||||||||||||||||||||||||||||||||||
Importing |
controller: util-import-upload-attach
|
||||||||||||||||||||||||||||||||||||||||||||||||||||||
Deleting |
Use popover as a confirm.
|
||||||||||||||||||||||||||||||||||||||||||||||||||||||
Saving |
Use data scope; it only updates when it changes.
If new data, then need to set defaults.
|
bootstrap 4;
| Item | Description | ||||
|---|---|---|---|---|---|
Classes |
Common classes used in webapps:
|
Next stage of building;
| Item | Description |
|---|---|
Sequence |
|
Use form templates |
_[template name] and the .refresh() method to blend with data.
                      app.view.refresh(
                      {
                        scope: 'certification-body-supplier-edit',
                        selector: '#certification-body-supplier-edit',
                        data: data
                      });
|
Data getting |
Is it in the first get and can be merged with template {{}} or in a secondary get and set later |
Mindset tip |
Where is the form, where is the function? |
Updating the form (HTML) |
If you include the
-url_ directive in the name of your file the page you create using console.mydigitalstructure.cloud with the matching url will be automatically updated eg:
|
Developing locally |
You can develop on your device, i.e. without having to upload the HTML, CSS & JS to the cloud, by using mydigitalstructure-local.
|
Testing
Testing to ensure the webapp is as per the design.
| Item | Description |
|---|---|
Initialise |
Use the lab space to imitialise data and then give access to the client.
|
Types of testing |
There two types of testing:
|
Testing by you as the builder |
Use the Developer Tools in Chrome (or equivalent in your preferred browser). mydigitalstructure SDK sends messages to the console ie if it can't find a controller that it has been requested to be invoked.
Issues can also been logged on mydigitalstructure.cloud and access used console.mydigitalstructure.cloud > LOGS.
|
Testing by the client |
The client will use user accounts for each ofthe different user-roles to test form & functionality eg the user experience.
|
Testing tracking |
There are some good online issues tracking apps or you can use this example issues tracking sheet.
|
Go Live
The webapp (or part of it) is now as per the design and client has agreed for it go live!
| Item | Description |
|---|---|
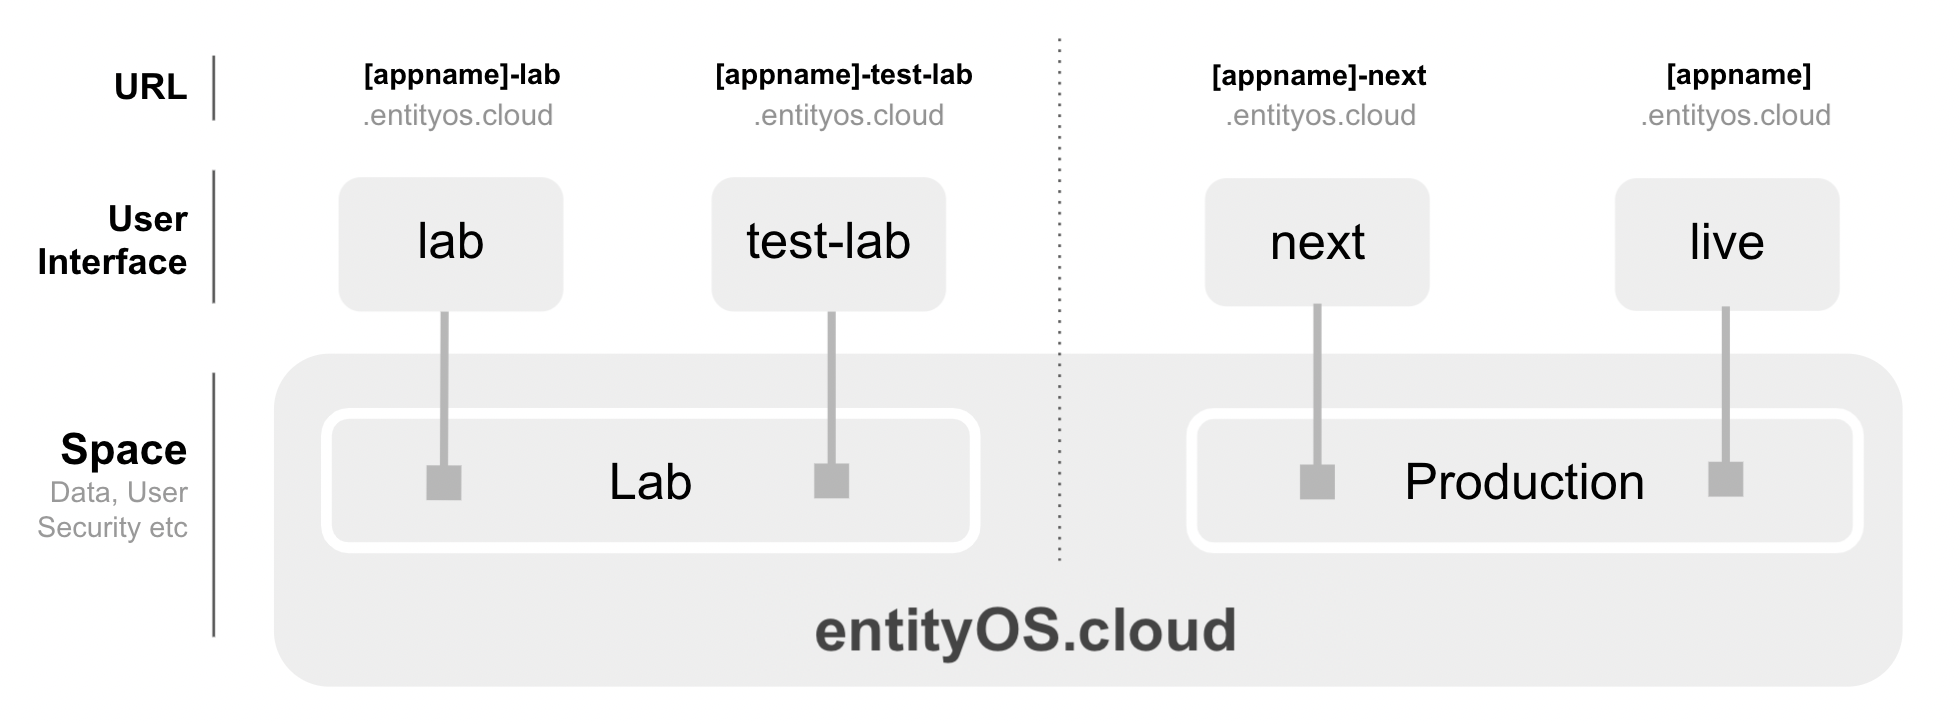
Concepts |
In addition to the lab site that has it's own space to contain it's test data there are two more sites set up in the production space:
This type of set up is referred to "Blue / Green" - it allows for seamless upgrading and continous incremental improvement, as it is a matter of simply switching the live URL and next URLs between the two sites. It results in zero downtime for updates, meaning they can be more frequent as the risk is reduced significantly.
|
Set up |
Create the production space and set up security etc
Set up the two sites (as a copy of site lab), import system data and user data.
Set up URLs.
|
Access URLs |
You can use a mydigitalstructure.cloud URL or use your own domain with SSL which support@mydigitalstructure.cloud will help with setting up for you.
|
Life after Go Live
Once a site "Goes Live", there will be incremental improves using continous incremental improvement - following the same process as the lead up to "Go Live":
- Continue build & test work in the lab space.
- Once tested OK and client test OK, move the lab code to the next site.
- Once tested OK and client test OK in the next and client agrees, switch the live URL to this site and the next site URL to what was the live site.
- Do not update the next site until you are sure the general users are operating OK on the new live, just in case you need to roll-back. If you want to preserve this site, you can simply create another site as the new next site with a unique URL.
Done!
What next?
Need help with any part of the build or costing it, then email us @ hello@mydigitalstructure.cloud