Quick Start
You don't need any traditional computer science/engineering or information technology experience to use mydigitalstructure.cloud.
Commonly the internet gets projected as a highly-technical environment, and it is true that it takes a lot of technology to make it work, but the real value of the internet is in its ability to organise and share information using a common language (set of protocols).
A key element of running any successful organisation is to be organised and one of the simplest ways to do that is by using an app built using the internet, a webapp.
This quick start guide will step you through what it takes to build a webapp using mydigitalstructure.cloud.
mydigitalstructure.cloud is a fully managed service and covers all the backend stuff so you can focus on the organisational needs & user experience.
Let's get started
We are going to jump right in by looking at the two basic components of any webapp, form & function.
Once you have completed the tutorials, then come back to this page.
The form controls how the webapp looks and is a key element of the user experience. The form is created using HTML & CSS.
The function controls how the webapp behaves; ie what happens when a user clicks a button. The function is constucted using Javascript code. All modern web-browsers work with Javascript based code.
You don't need to have mastered HTML, CSS or Javascript to continue with this quick start guide; just as long as you have a sense of their place in building a webapp.
Now let's get the tools we'll need
Now that you have a basic understanding of form & function as the building blocks of a webapp and the key concepts of HTML, CSS & Javascript, let's build a webapp using mydigitalstructure.cloud.
Install VS Code
(or your preferred text editor)
Go to console.mydigitalstructure.cloud and follow the instructions.
You have now created your own space on mydigitalstructure.cloud!
Using the link in the email you would have received; log on to the console.
Let's take a look under the covers
Using Chrome, go to console.mydigitalstructure.cloud (log on, if not already) and in the Quick Start section click Create Quick Start webapp - this will create an example webapp.
Once the example webapp has been created, in the Quick Start section click on the unique URL for your webapp. eg. https://site1930.mydigitalstructure.cloud.

Once open, log on using the same username & password that you used for the console.
Then in the Chrome address bar; click the three-vertical-dots icon (top, right hand side) > More tools... > Developer Tools.
You will then see a new window like the one below;

Relating back to what you have learnt in steps 1 to 4, there are two key tabs as highlighted in the diagram; Elements which shows the underlying HTML elements (with CSS classes) creating the form, and Sources which shows the JavaScript code that manages the function of the webapp.
If you right click on an element on the webpage and click Inspect, it will open that element up on the elements tab.
Now to make a change to the webapp
Assuming you have just completed step 5, let's get a source code file and edit it.
We will make a simple change to a JavaScript file to add the ability to view a contact's mobile (cell) number in the contacts list.
Let's first look at what exists in the sample webapp by clicking Contacts in the left hand menu. You will now see a list (table) with one row; your first name and surname.
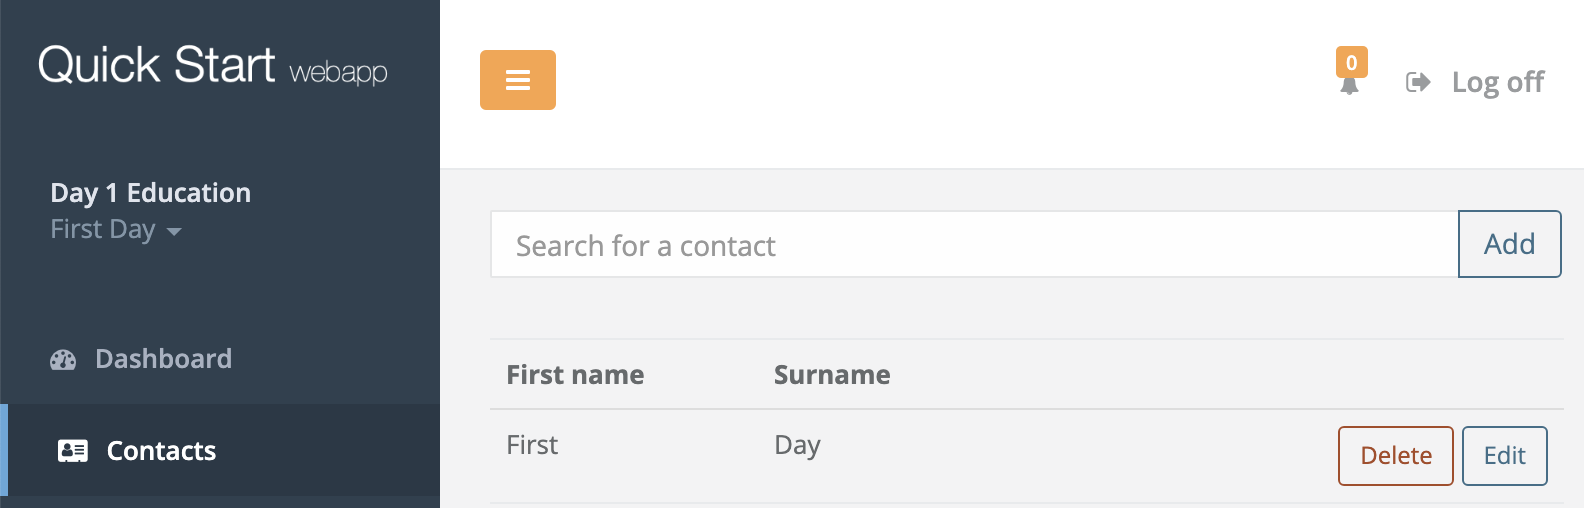
We are now going to add mobile (cell) number to this list.
In the Chrome Developer Tools window click Sources and then right click on 1901.app.contact-1.0.1.js (if you can't see the file, navigate to sites/1901) and select Save As.. and save the file on your computer, replacing the 1901 with your unique webapp (site) number.
The site number is the number after "site" in the URL of your webapp.
Open the Sublime text editor (or you preferred text editor) and open the file you just saved ie nnnn.app.contact-1.0.0.js, where nnnn is your unique webapp (site) number.
Now that you have the file open in the text editor, search for "Surname" and insert the code snippet below after the similar code for "Surname".
   {
      caption: 'Mobile number',
      field: 'mobile',
      sortBy: true
    },
Now save the text file and return to console.mydigitalstructure.cloud.
Update the webapp with the change
On the console home page in the Quick Start section click Edit the Quick Start webapp.
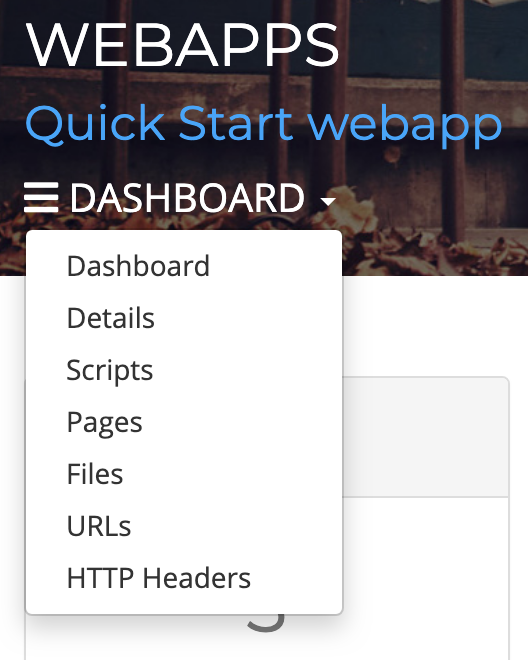
In the menu, under the site name and with three horizontal bars, select Files.
Then select the file you just edited and click Upload.
In the menu, under the site name and with three horizontal bars, select Pages.
Click on layout and in the text box scroll to the bottom until you can see;
<script src="/site/1901/1901.app.contact-1.0.1.js"></script>
Then edit this line to replace both instances of 1901 with your unique webapp (site) number and click Save.
Now go back to your webapp and using Chrome click the reload icon in the address bar.

You should now see your change!
Congratulations!
You can now make a change to a mydigitalstructure.cloud based webapp!!
What's next?
You've just made a simple user interface change to the Quick Start webapp - with the breadth & depth of mydigitalstructure you can do a lot more. You can build any type of organisational webapp for any size of organisation; the scale does not matter.
Next we will build on the start you have made, allowing you to do more.
Let's look at the changes you made in step 7 ("Edit the file") in more detail.
The example Quick Start webapp uses the mydigitalstructure Javascript framework (sometimes referred to as a library or SDK).
The Quick Start webapp also uses the bootstrap user interface framework.
For ease of documentation we will also use the Chrome web-browser, but of course you can use any modern web-browser.
RETRIEVING DATA
The code change you made in step 7, was essentially modifying the configuration options for the mydigitalstructure JavaScript "util-view-table" function to generate the list (table).
The "util-view-table" controller takes the configration options (a JavaScript object) and uses it to;
1) retrieve the data from mydigitalstucture.cloud
2) display the data to the user as a list (table).
To see the function retrieving the data from mydigitalstructure.cloud; go the the Quick Start webapp and make sure the Chrome Developer tools are open (see step 5) and click on the Network tab and click on XHR.

Then in the webapp, click on Contacts in the side menu and then you will see a CONTACT_PERSON_SEARCH network call on the networks tab.
Click on the network call and scroll to the bottom of the Headers tab and look for Form Data, there you will see the data sent to mydigitalstructure.cloud and then click on Response to see the data retured by mydigitalstructure.cloud.
The data returned is then used by the "util-view-table" controller, along with the configuration options, to display the list (table).
Tip; All returned data is stored in the app.data object within the Chrome browser - to see the data; using Development Tools click Console and then type app.data and press Enter.
SAVING DATA
Make sure the Chrome Developer Tools are open and the Network tab is visible and XHR clicked.
Using your Quick Start webapp, log on, click Contacts and click Add.
Enter a first name and surname and click Save.
Click on the network call that has CONTACT_PERSON_MANAGE and on the Headers tab and then scroll down to Form Data, you can then see the data that was sent to mydigitalstructure.cloud.
READY TO MAKE ANOTHER CHANGE?
Let's update the webapp to add the editing of a contact's mobile (cell) number; as we added to the contacts list (table) in step 7.
mydigitalstructure.cloud includes a set of common objects used by all organisations, in this case we are using the Contact Person object, it has a standard mobile field that we can use - back in step 7 that was the field value in;
            {
              caption: 'Mobile number',
              field: 'mobile',
              sortBy: true
            }
The first step is edit the app page to add a Mobile input box under the Surname input box.
Go to console.mydigitalstructure.cloud, click Edit Quick Start webapp and click on Pages, click on app.
In the large text box look for the HTML block that has a label of Surname;
<div class="form-group"><br /><h4><label class="text-muted text-center m-b-0 m-t-sm" for="contact-edit-surname-{{id}}">Surname</label></h4><br /><input type="text" class="form-control input-lg myds-text text-center" id="contact-edit-surname-{{id}}" value="{{surname}}" data-value="{{surname}}" data-id="{{id}}" data-scope="contact-edit-{{id}}" data-context="surname"><br /></div>
and after it add;
<div class="form-group"><br /><h4><label class="text-muted text-center m-b-0 m-t-sm" for="contact-edit-mobile-{{id}}">Mobile number</label></h4><br /><input type="text" class="form-control input-lg myds-text text-center" id="contact-edit-mobile-{{id}}" value="{{mobile}}" data-value="{{mobile}}" data-id="{{id}}" data-scope="contact-edit-{{id}}" data-context="mobile"><br /> </div>
Click Save
Go back to your webapp and click the Chrome reload icon. Now click Contacts and click on Edit for the first contact, you should now see the Mobile Number input box.
The mydigitalstructure SDK controllers (Javascript code) will automatically set the data in this input box using the {{mobile}} tag and when you click Save automatically send the data to mydigitalstructure.cloud using the data-context="mobile" attribute, if the data has changed.
CONGRATS AGAIN!
You've now worked through the key concepts of building a mydigitalstructure.cloud based webapp!!